
 Universal - go to homepage
INSTRUCT
DEVELOP
ASSOCIATION OF PROFESSORS OF GYNECOLOGY AND OBSTETRICS

Pelvic Exam
Description
When teaching the pelvic examination, the instructor should be sure that the learners have a firm knowledge foundation of pelvic anatomy. This can be provided through written materials, plastic or cadaveric dissection models, web-based or other computer assisted models and/or didactic presentations. The skills required for the performance of a patient-centered pelvic examination may be broken down into communication or interpersonal skills and technical skills. Important components are listed below and references are provided for more detailed information.
Prerequisite
- Knowledge of pelvic anatomy
General Approach/Interpersonal Skills
- Components of health history pertinent to pelvic exam
- Health prevention/counseling
- Language and communication
Techniques
- Preparation: equipment, positioning of patient, washing hands
- Inspection: external genitalia
- Speculum insertion: inspect vagina and cervix; collect appropriate specimens (see separate section in this curriculum for these specific skills)
- Palpation: bimanual exam and rectovaginal exam
- Completion of exam: repositioning patient, washing hands, putting away equipment, explanation of exam results, addressing patient’s questions
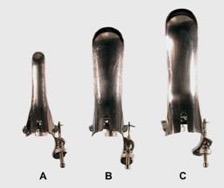
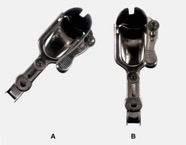
Photographs of different speculum types and sizes, as well as diagrams of proper technique, may be used in the didactic preparation or as a written handout. Some examples are provided below.
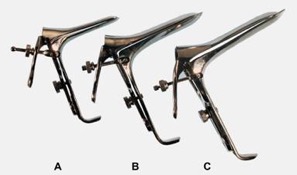
 Metal speculae (front view): A) small Pedersen, B) medium Graves, C) large Graves
 Metal speculae (side view): A) small Pedersen, B) medium Graves, C) large Graves
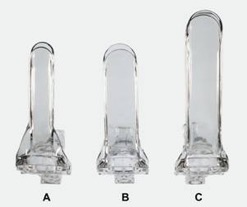 Plastic speculae (front view): A) small Pedersen, B) medium Pedersen, C) large Pedersen
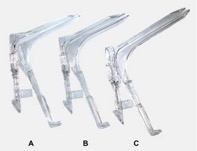 Plastic speculae (side view): A) small Pedersen, B) medium Pedersen, C) large Pedersen
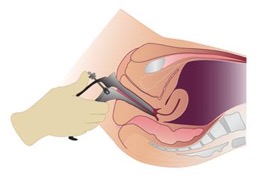
 A) Angle of insertion at entry and B) Angle at full insertion
 Angle at full insertion
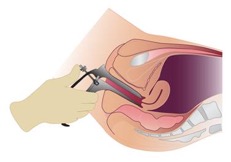 Open speculum cupping cervix
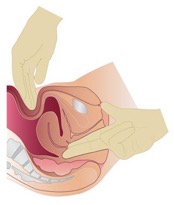 Bimanual examination
NOTE: This entire module is also available in PDF Format.
Learning Outcomes
The pelvic examination* is an important component of women’s health care, and the American College of Obstetricians and Gynecologists (ACOG) recommends yearly pelvic examinations for women 21 years or older. The purpose of teaching medical students how to perform the pelvic examination is to complement the history, provide additional information, determine diagnosis and guide management. It also provides the opportunity to educate and reassure the patient.
The intended learning outcomes for teaching the pelvic examination are for the student to demonstrate ability to:
- Interact with the patient in a way that elicits confidence and cooperation and assures the patient’s comfort and privacy
- Perform the complete examination in a sensitive manner
- Use appropriate medical terminology and communication skills when performing the exam and to communicate the results and educate the patient
*APGO Medical Student Educational Objectives, 10th Edition
Best Practices
Instruction in pelvic examination skills in undergraduate medical education may be provided in the preclinical years (typically during a physical examination skills course or program) and the clinical years (typically during the ob-gyn clerkship). Currently, 65 percent of medical schools utilize Gynecological Teaching Associates (GTA) to teach pelvic examination skills.
In general, instruction begins with some form of introductory preparation, which may include any of the following, alone or in combination: reading materials, video or PowerPoint presentation, and/or class discussion (suggested videos are listed in resources). This introduction is followed by an examination demonstration by the instructor and then supervised practice by the learner. Methods for these latter components of instruction include the following:
- Observation (demonstration), supervision (+/- checklist) and feedback in actual patient care setting
- Demonstration and practice with feedback using plastic pelvic models (non-computerized and computerized)
- Demonstration and supervision of examination by faculty using live models or simulated patients not specifically trained to provide feedback (feedback is provided by the faculty supervisor)
- Demonstration and supervision of examination by Gynecology Teaching Associate (GTA or live simulated patient specifically trained to instruct and provide feedback; faculty not required to be present)
Performing a comprehensive patient-centered pelvic examination requires an integrated series of effective cognitive, psychomotor and interpersonal skills. Training of medical students in this set of skills can be challenging to the instructors and anxiety-provoking to the students. As listed above, a variety of methods have been utilized for training purposes and each has its advantages and disadvantages (see Table 1 in the practical tips section of this manual). Checklists may be used with any of these methods of instruction. An example checklist is provided in the next section.
The opportunity for supervised practice of skills with feedback appears to be essential, regardless of the method of instruction used for training in pelvic examination skills. Beckmann and colleagues reported methods of initial instruction in pelvic exam skills for learners. 72% of schools reported initial instruction occurring in the preclinical years, while 15% started in the clinical years.1 Traditional didactic sessions with lecture and film alone are not adequate. Depending on resources and institutional or departmental commitment, the method of choice will likely depend on the available resources, and may include any of the following: GTAs, high- and low-fidelity pelvic models and live models. Training in the actual patient care setting is also an effective method of instruction. However, as noted in Table 1, this method may not be appropriate for the initial instruction in the pelvic examination. Learners should be provided an opportunity to practice the mechanics of the pelvic examination on either high- or low-fidelity plastic pelvic model prior to the first patient encounter.
Case Scenario
A 19-year-old G0 who is presets for her annual gynecological examination. You will not perform a Pap smear, as the patient is under 21 years old and has been sexually active for less than 3 years. You will have 15 minutes to complete this focused patient encounter. You should only address the tasks listed below:
- Obtain a focused gynecological history
- Perform a comprehensive speculum and pelvic examination
- Counsel the patient on the findings from the exam
You may not re-enter the room after leaving.
Checklist
Checklists may be used for teaching and/or for assessment. The checklist should be completed by a trained observer with knowledge of the proper technique of the clinical skill. Due to the nature of the techniques required, an in-room observer is essential to evaluate the technical skills. This observer may be a health care professional or GTA. If the session is taped, the history and communication portion of the checklist may be completed by a trained remote observer.
| Done | Not Done |
|
| General Approach and Communication Skills | ||
| Properly introduces himself or herself to the patient | ||
| Asks patient how she would like to be addressed | ||
| Clarifies purpose of visit | ||
| Washes hands or uses an antiseptic wash | ||
| Uses appropriate draping techniques for patient privacy | ||
| Maintains sterile technique | ||
| Performs the exam in a systematic fashion | ||
| Prefaces exam maneuvers with simple explanations | ||
| Establishes and maintains rapport with the patient | ||
| Makes the patient feel comfortable | ||
| Closes the exam in an appropriate manner | ||
| Gives explanations in clear language; avoids jargon | ||
| Invites questions/checks for understanding | ||
| Focused History | ||
| LMP | ||
| Age at first menses | ||
| Duration of flow | ||
| Days between periods | ||
| History of abnormal pap test | ||
| History of sexually transmitted infections | ||
| Sexual activity, men/women/both | ||
| Number of partners | ||
| Age at first intercourse | ||
| Type of contraception | ||
| External Examination | ||
| Checks all equipment/supplies | ||
| Adjusts exam light prior to gloving and washing hands | ||
| Positions patient on back, hips to end of table and heels on foot rests | ||
| Examines external genitalia | ||
| Inspects mons pubis | ||
| Inspects labia majora | ||
| Inspects labia minora | ||
| Inspects clitoris without touching clitoris | ||
| Inspects urethral meatus | ||
| Inspects introitus | ||
| Inspects Bartholin’s gland | ||
| Inspects perineum | ||
| Inspects anus | ||
| Speculum Examination | ||
| Holds speculum at 45-degree angle | ||
| Inserts speculum properly | ||
| Rotates speculum at full insertion | ||
| Opens speculum slowly | ||
| Identifies cervix | ||
| Secures speculum in open position | ||
| Handles speculum appropriately | ||
| Removes speculum appropriately | ||
| Bimanual Pelvic Examination | ||
| Introduces correct two fingers into vagina with thumbs tucked | ||
| Palpates cervix and cervical os | ||
| Palpates uterine body, apex of fundus | ||
| Notes uterine size | ||
| Describes position of uterus | ||
| Palpates right adnexa/ovary | ||
| Palpates left adnexa/ovary | ||
| Instructs patient to return to sitting position at conclusion of exam | ||
| Rectovaginal Examination* | ||
| Re-gloves for RV exam | ||
| Asks patient to bear down as finger is inserted | ||
| Inserts middle finger into rectum | ||
| Inserts index finger into vagina | ||
| Palpates uterus | ||
| Palpates right adnexa/ovary | ||
| Palpates left adnexa-ovary |
*Often not performed on GTA—student only asked about technique.
Performance Assessment
Once adequate practice has been obtained, either with plastic pelvic models, live models, GTAs or actual patient encounters, a formal assessment of knowledge and skills can be conducted. There is currently a lack of evidence to suggest which assessment approach is optimal for pelvic exam skills. Therefore, we suggest that assessment of this skill may be conducted through direct observation using a standardized patient encounter or with a pelvic model simulator (non-computerized or computerized plastic pelvic model). The following resources may be used to conduct the assessment:
- Standardized case scenario
- Skills assessment checklist
Practical Tips
Developing a standard protocol for training students in pelvic examination techniques allows for consistent instruction and feedback. In addition to the instructional materials and program for the students, investing some time in training the faculty, residents or other instructors (“train the trainer”) is valuable. Do not assume that all your teachers will use the techniques you prefer or have prepared the students to use—make your expectations for instruction, feedback and assessment clear.
- Photographs of different speculum types and sizes, as well as diagrams of proper technique, may be used in the didactic presentation or as a written handout. Some examples are provided in the “Description” tab of this resource.
- Standard physical examination text books are available for students and training instructors’ reading, with detailed information on history-taking, counseling and techniques of the pelvic examination.
- Video presentations illustrating the pelvic examination are available for purchase or as a downloadable version with journal subscription (see Resources).
- For access to live models or GTAs, there are several potential options:
- Contact your school of medicine or school of nursing and inquire about any existing simulated or standardized patient programs and clinical skills facilities.
- Contact the Association of Standardized Patient Educators (ASPE) for resources in your area or guidelines for developing your own program Educators (ASPE) for resources in your area or guidelines for developing your own program.
- Perform an Internet search using keywords such as, “simulated patient,” “standardized patient,” “gynecology teaching associate,” etc., and your city, state or region. In addition to academic program resources, there are private companies or businesses in some areas of the country that will provide SPs or trained GTAs for a fee or contract (e.g., Project Prepare in the San Francisco, California, area)
- Query an education list serve for resources in your area or advice (e.g., Brown University Acad Ob-Gyn Listserv, registration information on apgo.org under “For Educators” or “For Clerkship Directors”).
See table below, for advantages and disadvantages of different training methods.
Advantages, Disadvantages and Cost Considerations for Available Methods of Training in the Pelvic Examination
Training Method 1
Actual patient care setting/ faculty or resident supervision
Advantages
- Available population undergoing pelvic exam
- Realistic
- Spontaneous
- Abnormal pathology
Disadvantages
- Potentially uncomfortable educational experience for student
- Need for repeat exam by faculty and potential patient discomfort
- Uncontrolled environment
- Patient habitus may be an issue
- Inconsistent exposure/instruction
- Limited feedback by faculty or patient
- Limited practice with each exam
Cost Considerations
- Potential to slow office pace/fewer patient visits with student
- Faculty time
Other Comments
- Patients may decline participation/student gender influence
- Use of a checklist or focused assessment form during real patient encounter may allow for more consistent instruction and feedback
Training Method 2
Plastic pelvic models
Advantages
- Easy access at any time
- Portable
- Controlled environment
- Allows for consistent instruction and feedback
- Opportunity for repeated practice
- May re-use same equipment
Disadvantages
- Less realistic
- Cost of model and maintenance
- Difficult to teach internal exam without computerized model
Cost Considerations
- Limbs and Things pelvic trainer
- Pelvic ExamSIM™ (METI) pelvic trainer (computerized model with sensors on internal organs)
Other Comments
- Instruction may be provided by faculty, residents or other trained personnel (e.g. nurse practitioner)
- Training of instructor and use of checklist allows for more consistent instruction and feedback
- May focus on interpersonal and communication skills in addition to technical skills
- May be used for assessment of skills in OSCE setting
Training Method 3
Live model or SP (not specifically trained to provide feedback)
Advantages
- Realistic
- Controlled environment
- Allows for consistent instruction and feedback
Disadvantages
- Need to recruit models/availability of models and scheduling issues
- Models not trained to provide feedback on internal exam and comfort
- Limited opportunity
- Need clinical exam facilities and equipment (office space in off hours or clinical skills laboratory space)
- Need to clean equipment for each exam
Cost Considerations
- $25-$50/hour or per exam depending on rates in region
- Faculty time
- Clinical space
- Equipment and cleaning costs
Other Comments
- Same as for plastic models
Training Method 4
Gynecology Teaching Associate (GTA) or professional patient (specifically trained to instruct and provide feedback)
Advantages
- Realistic
- Controlled environment
- Allows for consistent instruction and feedback- Models training to provide feedback on internal exam and comfort (do not need faculty participation during student training)
Disadvantages
- Need to recruit and train GTAs
- Availability of GTAs
- Need clinical exam facilities and equipment (office space in off hours or clinical skills laboratory space)
- Need clean equipment for each exam
Cost Considerations
- $25-$50/hour or per exam depending on rates in region
- Requires institutional or departmental commitment to ongoing training program, faculty or coordinator supervision of program and scheduling
- Clinical space
- Equipment and cleaning costs
Other Comments
- Same as for plastic models
- Faculty supervision of actual teaching session not necessary as GTAs act as instructors- Associated with high student satisfaction and improved interpersonal and communication skills when compared to clinic patient and non-computerized plastic model training
Resources
Textbooks
- Bates’ Guide to Physical Examination & History Taking, Ninth Edition, by Lynn S. Bickley and Peter G. Szilagyi, Lippincott Williams & Wilkins, 2007.
- Textbook of Physical Diagnosis – History and Examination, 5th Edition, by Mark H. Swartz, W.B. Saunders Company, 2006.
Models
- Limbs & Things, Clinical Female Pelvic Trainer, www.limbsandthings.com
- METI Pelvic ExamSIM™
http://www.dadialmedica.com.mx/brochures/ExamSIM_User_Guide.pdf (last accessed January 4, 2017).
Additional Resources
- Beckmann CRB, Spellacy WN, Yonke A, Barzansky B, Cunningham RP. Initial instruction in the pelvic examination in the United States and Canada, 1983. Am J Obstet Gynecol 1985;151:58-60.
- Dugoff, Lorraine; Pradhan, Archana; Casey, Petra; Dalrymple, John; Abbott, Jodi; Buery-Joyner, Samantha; Chuang, Alice; Cullimore, Amy; Forstein, David; Hampton, Brittany; Kaczmarczyk; Katz, Nadine; Nuthalapaty, Francis; Page-Ramsey, Sarah; Wolf, Abigail; Hueppchen, Nancy. “Pelvic and Breast Examination Skills Curricula in United States Medical Schools: A Survey of Obstetrics and Gynecology Clerkship Directors.” BMC Medical Education. December 2016.
- Kamemoto LE, Kane KO, Frattarelli LC. Pelvic examination teaching: linking medical student professionalism and clinical competence. Hawaii Medical Journal 2003;62:171-2
- Edelman A, Anderson J, Lai S, Braner DAV, Tegtmeyer K. Pelvic Examination. NEJM 2007;356:e26, available at https://www.youtube.com/watch?v=CCHPclA9Vmk (last accessed February 25, ).
- Nelson EL. Teaching the female breast and pelvic exam: a student- and patient-centered approach. MedEdPORTAL Publications. 2016;12:10399. http://dx.doi.org/10.15766/mep_2374-8265.10399 (last accessed February 25, 2017).