
 Universal - go to homepage
INSTRUCT
DEVELOP
ASSOCIATION OF PROFESSORS OF GYNECOLOGY AND OBSTETRICS

Knots and Sutures
Description
This program includes knot-tying and suturing. We recommend a knot-tying board and either suture pads or some other simulated “incision” for suturing practice. In preparation for the exercise, students will need the following materials:
- Instructional video on knot-tying and suturing (see references)
- Knot-tying manual
- Knot-tying kit and practice board
- Two-colored string (to ensure observation of square knots)
- Suture pads for “incisions” (or felt, sponge or other materials)
- Needle driver
- Tissue forceps
- Suture material
- Scissors
It works well to put all the instruments into a quart-size disposable freezer box.
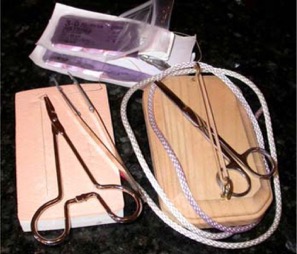
Suture kit
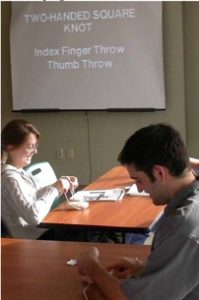
Knot-tying
Exercise
An instructional video should be provided for the class to review in advance. The students can then practice the technique while the instructor(s) circulates, emphasizing proper technique. Students check off the skills as they are learned and practiced (see checklist on next page).
NOTE: This entire module is also available in PDF Format.
Learning Outcomes
This clinical skills module was designed to teach basic technical skills and enhance the students’ ob-gyn clerkship experience. The intended learning outcomes for this module are to:
- Learn to tie two-handed and one-handed knots
- Learn to tie when needle is still attached
- Learn proper technique for handling suturing instruments (suture, needle, needle driver, pick-ups, suture scissors)
- Practice suturing in interrupted fashion
- Practice continuous non-locking suturing
Best Practices
We recommend that the knot-tying and suturing program be taught by experienced instructors (resident or faculty), with a relatively small group of students (<20), with a minimum of one instructor for each eight students. The program is best done before clinical experiences begin on the ob-gyn or the surgery rotation. We recommend at least a 1.5-hour session to learn and practice knot-tying and suturing. Performance assessment may take place after the ob-gyn rotation or at the end of the third year.
The program may be evaluated by assessing student satisfaction and student participation in surgical procedures throughout the clerkship. An optional Caesarean delivery model is also provided below, which can be used for the more advanced student.
Continuous suturing
Optional Mock Cesarean Section Exercise
This exercise requires approximately 1.5 hours. It is a fun activity that expands on the basic suturing exercise. It allows students to review the anatomy of the abdominal wall and to see how to break down a surgery into component parts.
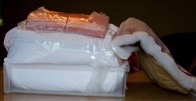
Creating the Bubble-Wrap “Abdomen”
The model is constructed in layers. Bubble wrap or a pillow is folded into a plastic box to mimic the pregnant abdomen. The uterus is made from styrofoam cup holder material. A sheet of tulle fabric is folded in half and taped to the foam for the bladder, then plastic wrap stretched over both to create the vesico-uterine peritoneum. These layers are firmly taped to the bubble wrap. The upper layers are laid out separately and stapled together, starting from “skin” made of microsuede, “subcutaneous tissue” made from batting, “fascia” made from muslin, two layers of “rectus muscles” made from felt, and “parietal peritoneum” made from swimsuit material. After these layers are stapled together, they are firmly taped on top of the “uterus.”
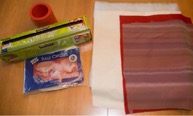
Materials for model
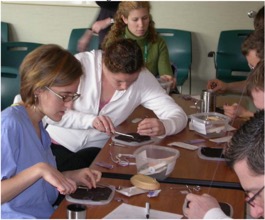
Model being constructed
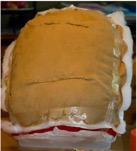
Completed Model
Other materials required for the exercise:
- Borrowed set of Cesarean Section instruments from OR
- Suture
- Skin staplers
- Electrocautery devise, suction, and abdominal drape from OR, which can be reused with each session
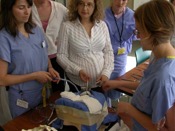
Overview
- Allow about 1.5 hours for the mock Cesarean section
- The instructor initially reviews the steps of the Cesarean section and the instruments used for each layer
- Students have the steps written down for them in a checklist
- In this exercise, students “enter” the abdomen layer by layer, using appropriate instruments and retractors
- They then close each layer with appropriate suture, instruments and body mechanics
- Four to five students share one model, taking turns with being the primary surgeon and first assistant.
- One instructor can move between two model tables
Mock Cesarean Checklist
| Done | Not Done |
|
| Review instruments to be used: Metzenbaum, Mayo and bandage scissors; needle driver; tissue forceps; retractors; Kocher clamps; Allis clamps; hemostats; electrocautery device; suction; skin staples |
||
| Mark where the incision will be | ||
| Incise the skin and subcutaneous layer with the scalpel | ||
| Retract the subcutaneous tissue | ||
| Identify the fascia, incise it in the midline with the scalpel | ||
| Using tissue forceps and Mayo scissors, extend the fascial incision laterally | ||
| Apply Kocher clamps to the cut fascia to elevate it off the rectus | ||
| Retract the fascia | ||
| Identify the peritoneum, tent it up with tissue forceps | ||
| Incise the peritoneum with Metzenbaum scissors | ||
| Identify the bladder and vesico-uterine peritoneum | ||
| Using forceps and Metzenbaum scissors, incise the vesico-uterine peritoneum | ||
| Dissect the bladder from the lower uterine segment | ||
| Insert the bladder blade | ||
| Using the scalpel and the suction devise, make a low transverse uterine incision in the midline | ||
| Extend the incision with bandage scissors | ||
| Close the uterine incision with running, locking suture from apex to midline | ||
| Close the fascia with a running suture from apex to midline | ||
| Close skin with skin staples |
Checklist
The following checklist may be used as a component of the training session and/or as a component of a performance assessment as part of an objective structured clinical examination.
| Done | Not Done |
|
| Tie a two-handed knot using the two-colored string | ||
| Use the suture board and a piece of suture, tie a two-handed knot that approximates the rubber bands on the suture board | ||
| Tie a one-handed knot using two-colored string | ||
| Using the suture board and a piece of suture, tie a one-handed knot that approximates the rubber bands on the suture board | ||
| Open a suture packet and load the needle into the needle driver, always holding the needle with tissue forceps | ||
| Hold the needle in your dominant hand and tissue forceps in your non-dominant hand | ||
| Pick up the edge of the “incision” with your tissue forceps | ||
| Place a single suture through the incision, with the needle entering the tissue at a 90-degree angle | ||
| Cut off the needle and tie a two-handed knot that approximates the edges of the incision | ||
| Repeat this process using a one-handed knot | ||
| Place sutures in continuous fashion, stitches one cm apart and one cm deep | ||
| Tie knots at both ends of the continuous stitch, with the needle still attached | ||
| Dispose of needle appropriately |
Performance Assessment
For evaluation, the student is asked to close an incision in continuous fashion. The student must properly load the needle driver, tie a knot with the needle still attached, and place continuous sutures, placing them approximately 1 cm deep and 1 cm apart. The student must properly hold tissue forceps, as well as needle driver, and reload the needle driver using the tissue forceps. Finally, the student ties a second knot after cutting off the needle.
The student may be evaluated using the following checklist.
| Done | Not Done |
|
| Secure square knot with two-handed tie | ||
| Secure square knot one-handed tie | ||
| Correct technique for loading a needle driver | ||
| Correct technique for holding and manipulating a needle driver | ||
| Correct technique for holding and manipulating tissue forceps | ||
| Insert needle at 90-degree angle to the “tissue” | ||
| Correct technique for placing interrupted sutures | ||
| Correct technique for placing continuous sutures |
Practical Tips
- Loan suturing kits to students for the clerkship, so they can use down time on Labor & Delivery (L&D) or at home to practice knot tying.
- Disposable circumcision kits or disposable emergency room suture kits are a good source of instruments.
- Involve residents in the training day, whenever possible.
- Allow at least 1.5 hours and plenty of space for students to practice skills. If possible, allow them to stay in the room for an hour after the trainers leave.
- Encourage practice with placentas on L&D.
Resources
Student Surgical Association Surgical Knot Tying Tutorial:
http://www.youtube.com/watch?v=XHk_191uYP4